The Sierra High Route or “Roper’s High Route” is a 195-mile long high route through the Sierra Nevada Mountains of California. Developed by renowned mountaineer Steve Roper, the route is mostly cross-country, off-trail hiking. And the remainder is on the John Muir Trail and other marked trails.
Trail Overview
Length: 195 Miles
Time to hike: 10 -18 days, depending on fitness and preference
Start and End Points:
-
Southern Terminus: Roa’s End Trailhead, Sequoia & Kings Canyon National Park, California
-
Northern Terminus: Mono Village Campgrounds, Twin Lakes, California
Highest Elevation: Gabbott Pass 12,258, Multiple passes above 12,000 feet
Lowest Elevation: Middle fork of the Kings River on the John Muir Trail - 8700 feet
Steve Roper developed the Sierra High Route through the early nineties and released his guidebook, Sierra High Route: Traversing Timberline Country in 1997.
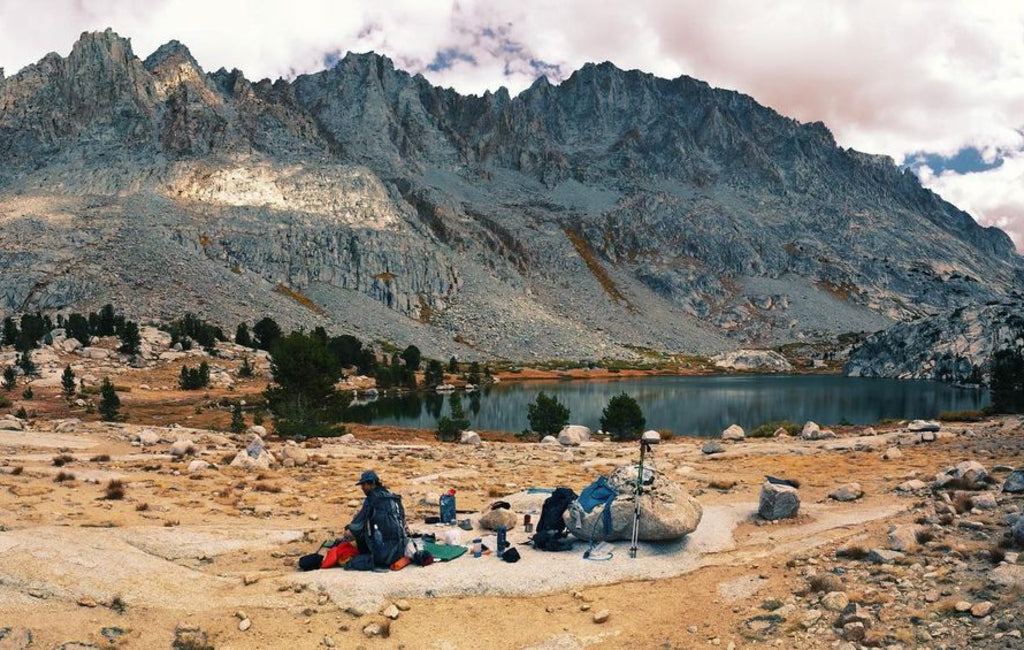
He conceived the high route as an alternative to the John Muir Trail that avoids the crowds and attempts to stay up high on the crest of the Sierra. Two friends and I tackled the SHR in summer 2019 as part of a thirty-six-day trip in the High Sierra. The Sierra High Route is regarded as a classic American hike. It truly is one of the most visually stunning places I have hiked through.
The portions of off-trail hiking that are away from established trails are extremely rugged and much harder than the time spent on well-groomed sections of trail. It involves steep ascents and descents on often unstable talus and is a considerable undertaking for even the most experienced hiker.
Navigation isn’t easy. Care must be taken when selecting your path through these areas. The navigation process and difficult terrain slows things down but also helps you appreciate and feel more connected to the area.

Planning Your Hike
WHEN TO GO: Timing, Weather, and Seasons
The Sierra sees a good amount of snow through winter and mosquitoes are an issue in early summer. Temperatures drop and winter conditions are common in the fall and so this makes the ideal hiking window somewhat short.
June, July, and August are the best time to hike. Expect lots of bugs in June, though.
Summer days are hot, sunny, and generally dry with very few rainstorms. Nighttime temperatures can drop to freezing. We experienced some snow at the end of our trip.
When hiking on the sections that use the JMT, you’ll come across many people and designated campsites are often crowded. This is in stark comparison to the off-trail sections where it’s rare to see other people.

DIRECTION TO GO: Northbound or Southbound?
The Sierra High Route can be hiked southbound or northbound and mainly depends on where it's easier for you to start/finish from. See more info below in the Getting There / Transportation section.
Hiking southbound means hiking into the sun. Not a huge concern but the sun's rays are pretty powerful up in the Sierra, and its effects are exacerbated by the glare when moving through snowfields.
The southern sections of the Sierra High Route receive less snow. So hiking northbound gives more time for snow to melt in the northern sections. The northern sections also usually get snow earlier in the year. So, if you’re starting late in the season, then southbound may be a better option.

GETTING THERE: Transportation
SOUTHER TERMINUS: ROADS’ END TRAILHEAD IN SEQUOIA & KINGS CANYON NP
A lot of people travel from Fresno, CA to the Roads’ End trailhead by taxi or, they arrange a ride through Craigslist. Note there is no public transport available. Fresno has a good airport with plenty of domestic flight options.
We flew into Los Angeles LAX and took a bus out to Visalia, CA. From there we took another bus as far as the Giant Forest Museum in Sequoia National Park and easily hitchhiked the rest of the way to Roads End.
NORTHERN TERMINUS: MONO VILLAGE CAMPGROUNDS, TWIN LAKES, CALIFORNIA
If heading northbound, you hike right into the Mono Village Campgrounds. After finishing our thru-hike in 2019, we hitchhiked into the nearby small town of Bridgeport (after celebrating with ice cream sandwiches). From there, the Eastern Sierra Transit Authority runs fairly regular shuttles. The shuttles go to Reno, Nevada, the nearest city that has a decent airport.
If Reno is an easier airport for you to fly into, then reversing this process is another viable option.

NAVIGATION: Maps and Apps
Steve Roper’s book is the first resource to pick up as it offers invaluable route tips and interesting insights into the area.
However, for navigation, you should look elsewhere.
Andrew Skurka’s map set and databook is a great resource. Printing out these paper maps and using them in conjunction with waypoints preloaded into the Gaia App via CalTopo makes for a solid navigation method. Carrying a compass is a smart thing to do, but we never used ours.
The sections on the JMT afford the ability to relax and cruise on easy trails. However, navigation on the off-trail sections takes extra time and adds complexity to already strenuous hiking.

PERMITS
Backcountry permits are required for the High Sierra. The area is managed by a few different agencies, but you only need to obtain one permit from the agency which manages the trailhead in which you start your hike.
FOR NORTHBOUND HIKERS:
In 2019 we were able to obtain walk-up permits at the Road’s End Trailhead with no issues. However, since 2020, it’s necessary to arrange your permit in advance if you wish to hike in the peak season, due to Covid-related issues.
Peak season runs from early June till the end of September.
The National Park Service website states that the application must be submitted at least two weeks before the day you will start hiking. It does not give information on how early you can submit your application, but it’s best to apply as early as possible.
The permits cost $10 per permit plus $5 for every person in your group.
More information can be found here.
FOR SOUTHBOUND HIKERS:
It is also necessary to organize a permit in advance if starting at Mono Lakes. The permits are issued by Yosemite National Park. You can apply up to 169 days before your start date and no later than 2 days beforehand. The website states: “ popular trailheads fill up the first day reservations are available”. So, again, book early!
The permits cost $5 per permit plus $5 for every person in your group.
More information can be found here.

HOW TO RESUPPLY: Food, Water, and Towns
To avoid unnecessary extra miles and hitchhiking into town, the best resupply option is to take as much food as you need to reach Reds Meadow. Reds Meadow is about 119 miles into the hike if you are headed northbound or 76 if you are hiking southbound.
The store at Reds’ Meadow sells a limited amount of overpriced food and drinks so it is best to pre-pack supplies and send yourself a box. They charge a fee of forty dollars plus three dollars for every day they hold it. More info can be found here.
You can also take advantage of the on-site shower and laundry services and there are cabins for rent and a restaurant on site.
Another option for resupply and/or town stops is to hitchhike or take the seasonal shuttle from Reds’ Meadow into the full-service town of Mammoth.
It is also possible to hike from Dusy Basin and down to the North Lake trailhead from which you can hitchhike into the small town of Bishop. Although, this adds extra mileage and, in my opinion, unnecessary complication.
GEAR: Thoughts and Recommendations
The gear I used on the Sierra High Route is very similar to the gear I'd be using for most three-season trips except for a few items highlighted below.
Things to note:
-
Temperatures: Daytime temperatures are warm enough for running shorts and a long sleeve shirt. Nighttime temperatures drop dramatically, and you may experience below-freezing temperatures and some snow. Using a 20 degree Fahrenheit sleeping bag and a winter-worthy sleeping pad means you should have no issues.
-
Sun: The sun is extremely powerful in the Sierra Mountains and sun protection needs to be taken into consideration. A peaked hat, good sunglasses, long sleeves, and plenty of sunscreen are recommended.
-
Bugs: Mosquitos and other flying bugs can be severe in early summer. I started with a tarp and bivy and switched out early to a fully enclosed tent I could eat in and escape to when we got to camp. A good head net is also recommended.
-
Ice Axe and Micro Spikes: There are always some unknowns on this kind of trip, so we carried microspikes and an ice ax with us. We didn't end up using them but it felt reassuring to have them along.
-
Bear Canister: Bear cans are mandatory in most parts of the Sierra. They are heavy and awkward but a necessary evil. See the listed of approved models here.
-
Emergency Messenger: Highly recommended. The Sierra High Route can be very remote when not on the John Muir Trail and the ruggedness of the terrain means that injuries and accidents are probable. See popular models.
-
GPS/Maps/Apps: Using pre-loaded waypoints with the Gaia app worked really well for us. But we also had paper maps and a compass, just in case. A dedicated GPS unit was not necessary. See the map section for more info.
To see exactly the gear I carried on the hike, check out the below video.
WHERE TO SLEEP: Camping, Shelters, and Hostels
There are no shelters on the Sierra High Route and carrying a shelter is a must. When on the sections that use the JMT it is necessary to camp at the designated campsites to prevent further impacts. Otherwise, it’s a case of setting up your tent wherever you like, ensuring to follow good leave no trace principles.
Although rain is rare and we cowboy camped regularly, it is a good idea to have a shelter that provides protection from bugs and adds a few degrees of warmth on very cold nights.
Fires are forbidden in many parts of the Sierra and there is really no need to have a fire in these fragile areas.

ADDITIONAL TIPS: Altitude Sickness and Safety Measures
Altitude sickness is a legitimate concern in the Sierra. Before starting our hike we spent one-night camping near the Roads’ End trailhead (5500 feet) which probably helped us acclimatize. None of us had major issues with elevation but everyone has different responses to altitude. If you start to feel bad it is best to descend until you start to feel better and if possible, try again the following day.
The other thing to be aware of is the ruggedness of the cross country travel and the remoteness of the area. Traversing steep mountain passes with no trail to follow and loose talus should not be undertaken lightly. Hiking with a partner or in a small group is wise. Knowledge of first aid and carrying emergency communication devices is mandatory in my opinion.

SIGHTS: Nature and Wildlife
-
Bears: Black bears are present in the Sierra, bear canisters are mandatory, and appropriate behavior must be taken to avoid attracting and interacting with bears. We did not, however, see any bears in over 35 days moving through the Sierra.
-
Horses: A more common site is seeing pack horses and their handlers moving through the more populated areas of the Sierra such as the JMT. They are often in large groups and can be easily scared. It's important to give them space on the trail and if you’re unsure what to do then ask the handlers what you should do.
-
Fish: The Sierra is also a great place for backcountry fly-fishing and my friend Cheesebeard brought along a small Tenkara fly-fishing rod and caught much fish during breaks and lunch stops. A fishing license is required and easily obtainable from outfitters in nearby towns.
-
Other Animals: Rattlesnakes are present in the Sierra, although we only saw one. Coyotes, marmots, squirrels, and chipmunks are also present and it’s important to follow good principles to avoid them associating people with food. This is made easier by the fact that you’re already carrying a bear canister.

 650-Calorie Fuel