We tested the best winter traction devices and crampons available today according to price, weight, and traction. Read on to see how they performed, which is best for you, and get some valuable buying advice.
Table of Contents
Best Winter Traction Devices
The best winter traction devices are:
- Best Microspike Winter Traction Device: KAHTOOLA MICROspikes
- Best Crampon Winter Traction Device: BLACK DIAMOND Neve Pro Crampon
- Best Ultralight Crampon: KAHTOOLA KTS Steel Hiking Crampons
- Best Budget Winter Traction Device: YAKTRAX Walk Traction Device
- Best Crampon for Serious Mountaineering: GRIVEL G12 New-Matic EVO Crampon
The product comparison table below is sortable. Click the arrow in the heading cell to sort the models by preferred spec.
| MODEL | PRICE | WEIGHT | TYPE | NO. OF SPIKES |
BINDING TYPE |
MATERIAL |
|---|---|---|---|---|---|---|
| 1. BLACK DIAMOND Neve Pro Crampon | $159.95 | 20.32 oz | Crampon | 10 | Step-In | Aluminum |
| 2. KAHTOOLA MICROspikes | $74.95 | 11.9 oz | Microspike | 12 | Hybrid | Steel |
| 3. KAHTOOLA KTS Steel Hiking Crampons | $169.95 | 8 oz | Crampon | 10 | Hybrid | Steel |
| 4. YAKTRAX Walk Traction Device | $24.99 | 4.48 oz | Anti-slip Coil | Not Applicable | Strap-On | Steel Coils |
| 5. HILLSOUND Trail Crampon Ultra | $84.95 | 14.3 oz | Crampon and Microspike | 18 | Hybrid | Steel |
| 6. GRIVEL G12 New-Matic EVO Crampon | $199.99 | 33.5 oz | Crampon | 12 | Hybrid | Steel and Plastic |
Best Crampon Winter Traction Device
BLACK DIAMOND Neve Pro Crampon
Price: $159.95

✅ Affordable
✅ Superior traction
✅ Durable
❌ Heavy
❌ Less packable
KEY SPECS
- Weight: 20.32 oz
- Type: Crampon
- Number of Spikes: 10
- Binding Type: Step-In
- Material: Aluminum
The Black Diamond Neve Crampon is our pick for the best overall crampon. Constructed from aluminum alloy, these are rugged and durable. Created for moderate snow climbing when approaching rocky alpine trails, we found the Neve crampon is great for lightweight performance. Its flexible construction will keep you moving quickly and confidently on steep or snowy terrain.
While $160 isn’t cheap, it is the most affordable crampon we tested. Weight-wise, we wish these were lighter. We found they took a little longer than other options to strap on. But once they are on, they stay securely on your feet. Like other crampon ice cleats, these are bulky when carried in a pack.
Best Microspike Winter Traction Device
KAHTOOLA MICROspikes
Price: $74.95

✅ Affordable
✅ Ideal for trail runners and thru-hikers
✅ Packable
❌ Not for mountaineering
KEY SPECS
- Weight: 11.9 oz
- Type: Microspike
- Number of Spikes: 12
- Binding Type: Hybrid
- Material: Steel
Thanks to their award-winning traction design, we found Kahtoola MICROspikes work well on loose trails and muddy tracks, as well as in snowy or icy conditions. These are light and tough, with 12 stainless steel snow spikes (3/8 inch length) per foot. We love these for thru-hiking and especially for trail running. They pack down small and offer good traction. We don’t love carrying an extra 12 ounces while backpacking, but in early or late season conditions, these are a great pick for the trail runners and thru-hikers out there.
Best Ultralight Crampon
KAHTOOLA KTS Steel Hiking Crampons
Price: $169.95

✅ Lightweight
✅ Good traction
✅ Durable
❌ Expensive
KEY SPECS
- Weight: 8 oz
- Type: Crampon
- Number of Spikes: 10
- Binding Type: Hybrid
- Material: Steel
Designed for rugged conditions, we love that the KTS Steel Hiking Crampons are flexible and ultralight, especially for a longer spiked crampon. At just 8 ounces, these are the lightest crampons on our list by a wide margin. They pack some serious traction too. We like the design with folding heel support and independent rear bindings. They are compact for when you need to stow them in your backpack.
We recommend these for backpacking, hiking, and non-technical mountaineering. We found them to sit between micro-spikes and hard-core crampons. They are easy to get on and off your shoes too. The biggest drawback is the price. These are the second most expensive winter traction device we tested at $170.
Best Budget Winter Traction Device
YAKTRAX Walk Traction Device
Price: $24.99

✅ Affordable
✅ Lightweight
❌ Less traction
❌ Not durable
KEY SPECS
- Weight: 4.48 oz
- Type: Anti-slip Coil
- Number of Spikes: Not Applicable
- Binding Type: Strap-On
- Material: Steel Coils
A spikeless ultra-lightweight design, Yaktrax Cleats fit over shoes for safety when walking, hiking, or jogging on packed snow or ice. We like how easy these are to take on and off. Simply put the tip over the toe of your shoe and pull the back into place. We also like that these will fit over any shoe type, from running shoes to winter boots. The $25 price tag is the most affordable on our list. And at 4.5 ounces, these are the lightest we tested.
The drawback is that these are designed for city environments or on well-traveled trails. We wouldn’t recommend these on any technical terrain. The coil design does a good job of preventing slipping, but the coils aren’t as durable as other models we tested. Still, the Yaktrax Cleats are a smart budget buy for day-to-day use in the city.
Best Crampon for Serious Mountaineering
GRIVEL G12 New-Matic EVO Crampon
Price: $199.99

✅ Excellent traction
✅ Very durable
✅ Best for serious mountaineering
❌ Expensive
❌ Heavy
❌ Bulky
KEY SPECS
- Weight: 33.5 oz
- Type: Crampon
- Number of Spikes: 12
- Binding Type: Hybrid
- Material: Steel and Plastic
If you want a pair of crampons for serious mountaineering, the Grivel G12 Crampons are our top pick. These puppies will take you from glacier strolls to grade 4 alpine ice. Alpine climbers and mountaineers count on them to take on any terrain that may be encountered in the mountains. Constructed from steel with 12 points on each foot, these ice cleats really attack the ice. We found the construction to be one of the most durable we tested. Grivel must think so too, and these come with a lifetime warranty.
We like the addition of anti-balling plates to keep snow from sticking to the bottom of them. For crampons, we found them a breeze to put on and take off, even if you happen to be wearing gloves. The major drawbacks for us are the price and the weight. At $200 and 33.5 ounces, the Grivel G12 Crampon is both the heaviest and most expensive we tested.
The Other Noteworthy Models
Hillsound Trail Crampon Ultra
Price: $84.95

✅ Great traction
✅ Affordable
❌ Longer spike length and heavier weight are not as good for trail running
KEY SPECS
- Weight: 14.3 oz
- Type: Crampon and Microspike
- Number of Spikes: 18
- Binding Type: Hybrid
- Material: Steel
The Hillsound’s Trail Crampon Ultra blends the line between microspikes and crampons. They look a lot like microspikes, but the longer spike length edges them a little closer to crampons. We found them to have excellent traction, similar to other lightweight crampons, and a little bit better than standard microspikes.
Designed with welded double-link chains and velcro strapping, they are durable and easy to take on and off. In total, there are 18 x 2/3” stainless steel snow spikes. We found the Trail Crampon Ultra works well in mud, ice, snow, and slush. The only real drawback for us is that the longer spike length and heavier weight aren't as good for trail running compared to the Kahtoola Microspikes.
Key Factors To Consider When Choosing
Price
Design and materials affect the cost of winter traction devices. Basic coil-style winter traction devices are the most affordable. Rugged, heavily engineered crampons cost the most.
Winter traction devices that provide the greatest value:
Most affordable winter traction devices:
Premium winter traction devices (most expensive):
Weight
The type of winter traction device is the biggest factor in weight. Coil traction devices and microspikes weigh the least. Heavy-duty crampons weigh the most.
The lightest winter traction devices:
Traction
Traction is how well your winter traction device can grip the ice and snow. Longer spikes and the total number of spikes will increase the amount of traction. As a general rule of thumb, crampons have the best traction, followed by microspikes.
The winter traction devices with the best traction:
Other Things to Consider
Winter Traction Considerations
Type
COIL: These are lightweight, low-profile winter traction devices most commonly used in the city or on well-packed trails. They rely on coils or chains to provide extra traction. These are the lightest tract devices out there but offer the least amount of traction.
MICROSPIKES: Generally, for backpacking or trail running on more moderate snowy or icy trails. It can be very light and ideal for ultralight backpacking or thru-hiking long-distance trails in winter. These "spikes" are typically only in the ¼" and ½" range. The line between microspikes and crampons continues to blur as more and more models come out with different designs.
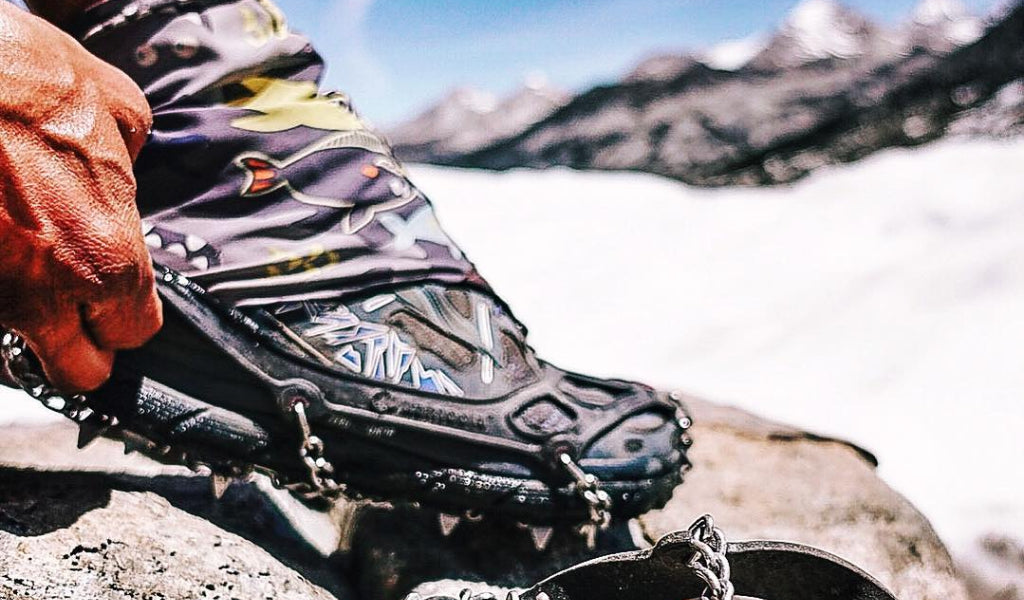
CRAMPONS: Crampons do the same thing as microspikes; they provide traction. However, these suckers look reptilian and have long spikes - usually 1" long. The good quality crampons will have well-spaced out strong spikes and thick straps. This thick metal frame is designed more for steep slopes; technical ice climbs, deep snow, or rocky ground.
SNOWSHOES: We’re not talking about snowshoes in this post. But, it is worth distinguishing them from microspikes and crampons. Snowshoes are often used for the same purpose - traction and increased foot surface area. These are used much more for deep snow and powdery conditions, though. Their bulky design can be extremely impractical to cover long distances on. Hence, we are not going to dig too much into them.
Packed Size
Often, you will only need winter traction devices for part of your hike, so you want them to be packable when not in use. Coil and microspike devices will pack down the smallest and can be stuffed in a bag. Crampons are more rigid; the longer points need to be packed in a way they don’t tear other items in your bag. These may have to be carried on the outside of your pack.
Ease of Use
You want to be able to slip winter traction devices on and off easily. You also don’t want to change your gait to walk in them. Microspikes and coil devices slip on and off easily. Usually, you can put them on in well under a minute. Crampon bindings will take longer to attach to your boots. However, when they are on, they should be rock solid on your boots.
Versatility
Coil and microspikes devices are very versatile. You can use them on almost any shoe or boot. They are great for a wide range of activities like walking, running, hiking, and less technical mountaineering. Crampons are less versatile. They are specially designed to work for alpine climbing but are less apt for city streets or trail running.

Fit & Compatibility
Coil and microspikes winter traction devices are designed to fit over a wide range of shoes and boots. These will fit snugly, thanks to the rubber that hugs the sides of your shoes. Crampons use bindings to fit into your boots. Not all crampons will fit all boots. You should ensure that the crampon sits centrally on the sole of the boot with nothing hanging from the sides. You’re looking for a solid fit with no wobble.
Durability
Durability is key when looking at winter traction devices. They should be able to withstand icy and rocky conditions in the extreme cold. Look for a tough chain construction and solid spikes that won’t bend on microspikes. For crampons, look for a tough decking material and strong points. Steel is the most durable material. Great for technical, steep, and icy terrain. Aluminum is lighter and ideal for alpine climbs. The downside is that they will wear out quickly if used on a rock.
Maintenance
Winter traction devices can require maintenance depending on the type. Crampons bindings can need adjusting on occasion. All types of winter traction devices should be cleaned and dried after use. The metal parts are prone to rust if stored wet.
Crampon Considerations
3 Types of Crampon Bindings
The type of binding you choose will depend on your boot and conditions. Boots with toe and heel welts accept almost any crampon. Lighter and less technical boots without welts will only take crampons with straps or hybrid crampons. If you wear over-boots, try the crampons with these in place, as the extra bulk will affect the fit.
- STEP-IN: Just like skis - step and snap-in. Best for boots with rigid soles or thick welts (the rubber rim from your shoe sole). This is the easiest, fastest, and most precise attachment system, especially if you have to put them on while wearing gloves. For this system, boots should have rigid soles and at least a 3/8" welt or groove on the heel and toe.
- STRAP-ON: Highly adaptable. The advantage of the strap-on system is that it can be used with virtually any boot or shoe and is perfect for moderate ice routes. You just have to ensure the center bar is compatible with your footwear. The attachment system is typically a pair of nylon webbing straps. Great for when you will be using multiple boots with the same crampon. Strap-ons are not as secure as step-ins - you can always get a little bit of wiggle and movement between the crampon and the boot. They take longer to attach than the step-in or hybrid style and are less reliable as the straps may loosen over time.
- HYBRID: Best used with lightweight mountaineering boots, as the hybrid system does not require a boot with a toe welt. They are relatively easy to put on even when wearing gloves, as you only need to pull on the toe strap and clamp down the heel lever. The attachment to the boot is created by combining a rear tension lever similar to that of step-in crampons with a forefoot strap. It is a simple form of attachment, sometimes referred to as mixed or half step, or semi-step. Designed for boots with a stiff sole plus a welt or heel groove to hold the heel lever.
Crampon Points
There is a huge range of models with different point configurations, with some having as many as 14 points. Traditional crampons have 12 points - 10 underfoot plus 2 front points that can either be vertical or horizontal oriented. The 10-point crampons - used for basic snow travel and ski mountaineering, not useful for actual climbing due to the points being shorter and less durable. Points and rigidity of crampons increase with the difficulty of the terrain.
The most important thing to consider is the shape and nature of the front points. The points need to be under your instep, following the shape of your boot. Some highly technical models have serrated sides on the points to allow for grabbing in places where a point won't penetrate the ice or snow. Points can be adjustable and replaceable on technical ice and mixed climbing crampons.
MODULAR and NON-MODULAR:
- Modular points are replaceable. The obvious advantage of modular points is that it is possible to replace the teeth. Preferable if you will need to use your crampons a lot as it is easier (and cheaper) to replace the points instead of the entire device. It can require a little more hardware to manage the screws.
- Non-Modular is fixed. It can be sharpened. However, these things are permanently attached. Aka - points go bad; you will need to replace the crampon. These are lighter, though.
FRONT POINTS:
- Vertical vs. Horizontal Points: Vertical front points are similar to an icepick, stiff and sharp, and point down. Vertical points are more precise because the points align with the grain of the ice. They do slice through snow, causing "balling" underfoot more so than other styles. Horizontal front points are ideal for alpine situations because they point forward and are meant to almost be kicked into an ice wall. Snowballing underfoot is minimal. Horizontal points are often used on flexible crampons for mountaineering.
- Mono vs. Dual Points: Mono is just what you'd guess - a single front point. Extremely precise and able to be stuck into a groove between icicles or a crack. They allow you to pivot your foot, drop your knee or shift your position without destroying your hold. Dual is, yep - a double front point. Less precise but has more surface area for more stability.

Crampons structure part anatomy.
Crampon Ratings
Similar to boots, crampons are rated based on their flexibility and how much support they provide. You want what is suitable for you and your conditions. Generally, the lower ratings are for snowy backpacking, and the higher numbers are for alpine ice climbing.
- C1 - crampons that are flexible with simple straps and usually ten points.
- C2 - crampons that are usually articulated with a heel clip with 12-14 points.
- C3 - completely rigid crampons with a heel clip and toe bail.
While we're on the topic, here are the mountain boot ratings:
- B0 - flexible. Ideal for light hiking.
- B1 - semi-flexible. Still suitable for hiking, yet more for tougher terrain or winter conditions. Ideal for use with a C1-rated strap-on crampon.
- B2 - fully stiff. Very common. Suitable for both walking and climbing in lower grades of winter mountaineering. Compatible with C1 and C2-rated crampons with a step-in binding at the heel.
- B3 - super rigid. Technical and insulated climbing boots for winter. Compatible with all types of crampons, including the rigid C3s with a full step-in binding at the heel and toe.
Anti-Balling Systems
Aka "antibot" plates, these are additional plates designed to prevent snow and ice from balling up under your boot, and they are pretty darn important. In extremely dangerous situations, your crampons can easily turn into slick skis if you don't have them.
Structure
When talking about structure, we are specifically talking about the metal frame arch. You should always match the flexibility of your boot with the flexibility of the crampon.
- FLEXIBLE: Best for hiking on softer ground - crunchy glaciers and packed snow. The center-hinged bar connects the front and back and is designed to flex with the boot for more natural walking. It can be used on technical vertical ice with a rigid climbing boot, but not ideal.
- SEMI-RIGID: The most popular for adaptability - they can be used in many environments. Flexible enough for walking, yet stiff enough for climbing. Some models have an adjustable bar that can change the crampon from a semi-rigid one to a flexible crampon which makes it more foot-friendly for hiking and less likely to ball up with snow. Fits a variety of boot shapes - think highly curved boots. The bar orientation will determine whether it is meant for the left or right foot.
- RIGID: The most technical crampons are used purely for vertical surfaces like ice climbing. Walking ain't too much fun in these.
© Ken Koh (@adventurenomad)

 650-Calorie Fuel