We tested the best backpacking stoves available today according to weight, price, boil time, and fuel efficiency. Read on to see how they performed, which is best for you, and get some valuable buying advice.
Table of Contents
Best Backpacking Stoves
The best backpacking stoves are:
- Best Overall Backpacking Stove for Weight, Price, Boil Time, and Fuel Efficiency: SOTO Amicus with Igniter
- Best Ultralight Backpacking Stove: SNOW PEAK LiteMax Titanium Stove
- Canister Stove with the Fastest Boil: MSR PocketRocket 2
- Best Budget Backpacking Stove: ESBIT Pocket Stove
- Best Backpacking Stove with Integrated Pot System: JETBOIL Flash
- Best Backpacking Wood Stove: VARGO Hexagon Wood Stove
- Most Versatile 4-season Backpacking Stove: MSR WhisperLite
The product comparison table below is sortable. Click the arrow in the heading cell to sort the models by preferred spec.
| MODEL | PRICE |
WEIGHT |
BOIL TIME |
SIMMER CONTROL? |
INTEGRATED? |
SCORE |
|---|---|---|---|---|---|---|
| 1. SOTO Amicus with Igniter | $44.95 | 3.5 oz | 3 min 52 sec | Y | N | 9/10 |
| 2. MSR PocketRocket 2 | $59.95 | 2.6 oz | 3 min 30 sec | Y | N | 9/10 |
| 3. SNOW PEAK LiteMax Titanium Stove | $59.95 | 1.9 oz | 4 min 25 sec | Y | N | 9/10 |
| 4. JETBOIL Flash | $124.95 | 13.1 oz | 3 min 20 sec | Y | Y | 8/10 |
| 5. VARGO Hexagon Wood Stove | $59.95 | 4.1 oz | 30 min | N | N | 8/10 |
| 6. ESBIT Pocket Stove | $15.95 | 3.25 oz | 16 min | N | N | 8/10 |
| 7. SNOW PEAK GigaPower 2.0 Auto | $49.95 | 4.23 oz | 4 min 48 sec | Y | N | 8/10 |
| 8. SOLO STOVE Lite | $89.99 | 9 oz | 8-10 min | N | N | 8/10 |
| 9. MSR WhisperLite | $134.95 | 14.9 oz | 4 min 40 sec | N | N | 7/10 |
| 10. MSR WindBurner | $189.95 | 15.3 oz | 4 min 30 sec | Y | Y | 7/10 |
| 11. JETBOIL MiniMo | $164.95 | 14.6 oz | 4 min 30 sec | Y | Y | 7/10 |
Best Overall Backpacking Stove
Soto Amicus with Igniter
Price: $44.95

✅ Inexpensive
✅ Lightweight
✅ Efficient
❌ None
KEY SPECS
- Weight: 3.5 oz
- Boil Time: 3 min 52 sec
- Simmer Control?: Y
- Integrated?: N
- Packed Size: 3.9 x 0.7 in
- Fuel Efficiency: 1.5 hours per 250g canister
Affordable, lightweight, and high-performance, the Soto Amicus 2.0 is cleverly designed and our top pick for the best overall backpacking stove. It’s a great all-around stove that scores highly in every category we ranked.
At $45, it’s the least expensive canister stove on our list. And at 3.5 ounces, it ranks right in the middle of the pack weight-wise too. It’s the second fastest and second most fuel-efficient canister stove we tested.
We like that it has a nice feature set despite its minimal nature. It has pot-support legs that spring open and lock into place, a burner with a raised ledge for extra wind protection, adjustable flame control, and an awesome “stealth” ignitor. As a bonus, a pairable cook set is available separately for purchase.
Canister Stove with the Fastest Boil
MSR PocketRocket 2
Price: $59.95

✅ Ultralight
✅ Fast boil time
❌ Less fuel efficient
KEY SPECS
- Weight: 2.6 oz
- Boil Time: 3 min 30 sec
- Simmer Control?: Y
- Integrated?: N
- Packed Size: 3 x 1.75 in
- Fuel Efficiency: 60 minutes per 8 oz canister
MSR’s PocketRocket 2 is an ultralight canister stove that boils water quickly. Getting to a boil in just 3.5 minutes, it boils water faster than all other canister stoves we tested. It’s the second lightest stove on our list at just 2.6 ounces. It also packs down super small and comes with a carrying case for extra protection.
It’s a no-frills stove but does come with a simmer control that we found to work well. The biggest drawback of this stove is its fuel efficiency. Despite the fast boil time, it runs slightly less than average compared to other stoves we tested. We recommend pairing it with a windscreen to try to offset this disadvantage.
Best Ultralight Backpacking Stove
Snow Peak LiteMax Titanium Stove
Price: $59.95

✅ Ultralight
✅ Efficient
❌ Longer boil time
KEY SPECS
- Weight: 1.9 oz
- Boil Time: 4 min 25 sec
- Simmer Control?: Y
- Integrated?: N
- Packed Size: 3 x 1.3 in
- Fuel Efficiency: 105 minutes per 8 oz canister
At 1.9 ounces, the Snow Peak LiteMax is the lightest stove on our list and our pick for the best ultralight backpacking stove. We like the nice-sized base for supporting larger pots and that the arms of this stove fold down for ideal packability.
We found it fuel-efficient, super small, and lightweight without giving up many features. It has simmer capabilities, boils quickly, and the burner is wind-resistant (however, not windproof.)
The boil time of 4 minutes and 25 seconds is the longest of all the canister stoves we tested. However, this is the most fuel-efficient canister stove we tested.
Best Backpacking Stove with Integrated Pot System
Jetboil Flash
Price: $124.95

✅ Fastest boil time
✅ Robust features
❌ Heavy
❌ Expensive
KEY SPECS
- Weight: 13.1 oz
- Boil Time: 3 min 20 sec
- Simmer Control?: Y
- Integrated?: Y
- Packed Size: 4.1 x 7.1 in
- Fuel Efficiency: 1 hour 15 minutes per 8 oz canister
The Jetboil Flash is the OG integrated canister system. The design has been tweaked over the years to include similar control and to streamline the system. The convenience of an all-in-one system can’t be denied.
The Jetboil Flash is our pick for the best integrated backpacking stove for several reasons. First, at 13.1 ounces, it is the lightest integrated system we tested. Second, it’s also the least expensive at $125. Third, and most important to us, it boils water fast. It takes just 3 minutes and 20 seconds to boil a liter of water, the fastest on our list.
However, like other integrated systems, the Jetboil Flash is expensive and heavy compared to all stove types. But if you’re not trying to be the most ultralight, the convenience of the all-in-one system makes the Jetboil Flash our top integrated stove and pot system. Read in-depth review on the Jetboil Flash here,
Best Backpacking Wood Stove
Vargo Hexagon Wood Stove
Price: $59.95

✅ Lightweight
✅ Fuel efficient
✅ Packable
❌ Longer boil time
❌ Tricky to regular flame
KEY SPECS
- Weight: 4.1 oz
- Boil Time: 30 min
- Simmer Control?: N
- Integrated?: N
- Packed Size: 5 x 3 in
- Fuel Efficiency: No fuel
The Vargo Hexagon is made of lightweight titanium that folds down super small, making it one of the most packable backpacking stoves. All pieces of the Vargo Hexagon are connected, making set-up a breeze.
We love the big open “doorway,” which gives easy access to the fire chamber. If we left the door open, it gave us a (mini) campfire vibe. We like that the chamber itself is big, a nice plus compared to other tiny wood-burning camp stoves.
The boil time is longer than the other options we tested. But since fuel efficiency isn’t as much of a concern with (hopefully) ample small wood around, it was less of a problem than with other stove types. It is tricky to regular the flame for cooking, and you need to be mindful in wet conditions to make sure you can start a fire.
Best Budget Backpacking Stove
Esbit Pocket Stove
Price: $15.95

✅ Best budget option
✅ Lightweight
❌ Longer boil time
❌ Fewer features
KEY SPECS
- Weight: 3.25 oz
- Boil Time: 16 min
- Simmer Control?: N
- Integrated?: N
- Packed Size: 4 x 3 in
- Fuel Efficiency: 12 minutes per 1 Esbit solid fuel tablets
The Esbit Pocket stove folds down to a size that’ll fit in your pocket. It runs on solid fuel cubes that burn for about 12 minutes each and can (almost) boil a liter in water in that amount of time. We recommend cooking in batches of 800g of water or less and bringing a windscreen to keep it one cube per boil.
The tablets are environmentally friendly, although we found them to have a slight “fishy” smell. In a pinch, you can burn wood with this stove. At just $16, this is by far the least expensive backpacking stove on our list. There is no control for cooking, but if you want to simply and cheaply boil water, the Esbit Pocket Stove is our top pick.
Most Versatile 4-season Backpacking Stove
MSR WhisperLite
Price: $134.95

✅ Can burn multiple fuels
✅ Best 4-season option
❌ Heavy
❌ Expensive
KEY SPECS
- Weight: 14.9 oz
- Boil Time: 4 min 40 sec
- Simmer Control?: N
- Integrated?: N
- Packed Size: 4 x 4 in
- Fuel Efficiency: 155 minutes per 20 oz canister
The MSR WhisperLite is the most popular and best-selling liquid fuel stove model. We like this classic design gives you a wide and stable cooking surface. It also has a lot of flame control for more advanced backcountry cooking. In optimal conditions, the WhisperLite isn’t as fuel efficient as some canister stoves.
However, in 4-season conditions, it shines, being more fuel efficient and reliable than other options we tested. It’s also the most versatile stove we tested. It can run on white gas, kerosene, and even unleaded gasoline, making it a favorite option when traveling in less developed countries. At $135 and weighing 14.9 ounces, it’s one of the most expensive and heaviest models we tested.
The Other Noteworthy Models
Snow Peak GigaPower 2.0 Auto
Price: $49.95

✅ Inexpensive
✅ Built-in ignition
❌ Less fuel efficient
❌ Slow boil time
❌ Heavy for minimal design
KEY SPECS
- Weight: 4.23 oz
- Boil Time: 4 min 48 sec
- Simmer Control?: Y
- Integrated?: N
- Packed Size: 1.5 x 3 in
- Fuel Efficiency: 45 minutes per 7 oz canister
The Snow Peak GigaPower Auto is the second most affordable minimal canister stove we tested. We love that it has a built-in 'auto' ignition and makes lighting easy. We also like that the four prongs provide a more stable cooking experience than other canister stoves.
At 4.23 ounces, the GigaPower Auto is the heaviest canister stove we tested. It also has the longest boil time of the canister stoves we tested, taking 4 minutes and 48 seconds to boil a liter of water. Combining this with the fact that it’s also the least fuel-efficient canister stove makes it hard for us to recommend the GigaPower over similar models.
Solo Stove Lite
Price: $89.99

✅ Fuel Efficient
❌ Tricky to regulate the flame
KEY SPECS
- Weight: 9 oz
- Boil Time: 8-10 min
- Simmer Control?: N
- Integrated?: N
- Packed Size: 4.25 x 5.7 in
- Fuel Efficiency: No fuel
The Solo Stove Lite is a compact furnace running on wood. Unlike other wood stoves that are essentially just metal walls, the Solo Stove is a high-tech cooking machine. We were impressed with the double walls, internal ventilation chambers, and screen shelf.
Like other wood stoves, the flame control is tricky, with the need to feed small sticks at just the right rate if you want to try to cook over this stove. It is heavier than solo canister stoves, but with no need to carry fuel, it may end up lighter overall.
Because it runs on wood, there is a risk of being unable to start a fire in damp and rainy environments. Read in-depth review of the Solo Stove Lite here.
MSR WindBurner
Price: $189.95

✅ Great features
✅ Packs compactly together
❌ Expensive
❌ Heavy
KEY SPECS
- Weight: 15.3 oz
- Boil Time: 4 min 30 sec
- Simmer Control?: Y
- Integrated?: Y
- Packed Size: 4.2 x 7 in
- Fuel Efficiency: 95 minutes per 8 oz canister
The MSR WindBurner gets rave reviews from the hiking community. Besides its functionality, a couple of cool perks set this all-in-one stove system apart. It's easy to set up, it lights in wind or rain like a champ, and all the pieces pack down together nicely and compact. We like that the personal-sized mug also has an insulator, a handle, and a lid with a drink or strain feature.
We recommend this stove more for boiling water versus cooking. However, we are a bit shocked at the hefty $190 price tag, $25 more than the second most expensive option we tested. We found the 15.3-ounce weight to be disappointing too, and this is the heaviest option we tested.
Jetboil MiniMo
Price: $164.95

✅ Lots of features
❌ Heavy
❌ Expensive
❌ Less fuel-efficient
KEY SPECS
- Weight: 14.6 oz
- Boil Time: 4 min 30 sec
- Simmer Control?: Y
- Integrated?: Y
- Packed Size: 5 x 5.5 in
- Fuel Efficiency: 1 hour 15 minutes per 8 oz canister
The Jetboil MiniMo stove is another all-in-one option with many features, including a push-button ignition and good fuel regulation for controlling heat output when cooking/simmering meals. We like the smaller size making this a packable integrated stove system.
We were disappointed by the MiniMo’s 4.5-minute boil time, over a minute longer than the Jetboil Flash. This makes it a less fuel-efficient option. We also found the 14.6-ounce weight and $165 price tag to be sub-par compared to similar options.
Key Factors To Consider When Choosing
Price
Simple canister stoves are some of the most affordable options. Integrated pot and stove systems are more expensive due to their design, features, and the fact that you’re buying a pot along with a stove. Basic tablet-burning stoves, like the ESBIT Pocket Stove, have almost no features and are the least expensive.
Backpacking stoves that provide the greatest value:
Affordable backpacking stoves:
Premium backpacking stoves (most expensive):
Weight
How much extra weight are you willing to carry for that hot meal? Stoves can range anywhere from 2 to 20 oz, and additional parts and fuel can add to that. Canister and liquid stove systems tend to be the heaviest. We recommend nothing over a pound, excluding the weight of your fuel.
The lightest backpacking stoves:
Boil Time and Fuel Efficiency
Faster boil times not only get food in your belly fast they also save fuel by needing to run your stove for less time. Canister stoves can blast out heat quickly, giving them the fastest boil times. Fuel efficiency is related to boiling time but also factors in how much fuel you’ll need to carry.
Looks for stoves with windscreens and heat sinks to minimize fuel use. Backpacking stoves that burn wood are the most fuel-efficient, with an endless supply of fuel when hiking in forests. Colder climates negatively impact both boil time and fuel efficiency.
Stoves with the fastest boil time:
Most fuel-efficient backpacking stoves:
Other Things to Consider
Types of Stoves
CANISTER STOVES
✔️ STABLE SURFACE TO COOK ON. Selecting a fuel tank with a wider bottom will distribute the weight of the stove evenly and make it more stable. With canister stoves, you can also purchase a “stabilizer,” which adds support by attaching around the bottom of the fuel tank.
✔️ ADJUSTABLE FLAME FOR A SIMMER OR FULL-ON BOIL. Having a stove with an adjustable flame helps to regulate and prolong the fuel supply. This feature is especially handy when you need to adjust heat levels to either quickly boil water or slowly simmer foods (i.e., eggs, bacon.)
✔️ READILY AVAILABLE TO RESUPPLY. Fuel canisters are common and easy to purchase on popular U.S. thru-hiking trails. However, they’re far less common in foreign countries.
✔️ STRONG FLAME TO FIGHT AGAINST HEAVY WIND. Canister stoves often have integrated designs. They heat by gas being released inside enclosed areas, which helps with wind resistance.
✔️ EASIEST TO SET UP AND FASTEST TO LIGHT. All you need to do is secure the fuel to the stove piece, turn on the valve, and light it to get things going. Super easy, and there’s usually no priming required.
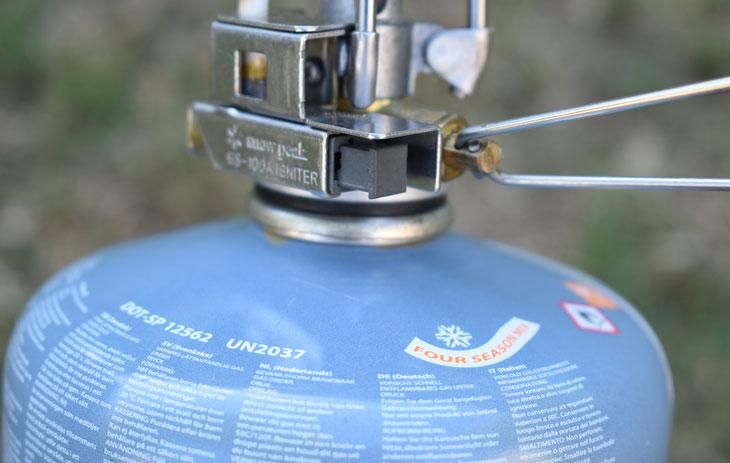
✔️ (SOMETIMES) NO LIGHTER IS NEEDED. Some have a built-in lighter spark that is as easy as clicking a button called a ‘Piezo Ignition.’ This can be a great feature to have because you can forgo packing extra lighting supplies. With a Piezo Ignition, the lighter connects to the fuel system and can be started with a simple push.
❌ SLIGHTLY HEAVIER THAN SOME OTHER STOVE OPTIONS. Solid fuel, wood burning, and alcohol stoves are smaller and lighter. The amount of fuel you carry and how compatible your system is can also greatly influence weight.
❌ SLOW FLAME IN EXTREMELY COLD CONDITIONS. Although a good option for 3-season hiking, temperatures below freezing can affect heating capabilities because canister stoves lose pressure, causing the flame output to become weak (or non-existent).

ALCOHOL STOVES
✔️ ULTRALIGHT. Weighs almost nothing. Weighing in under 2 oz, alcohol stoves are just about as minimal as you can get. Sure, they lack some bells and whistles, but their cheap, lightweight, and compact design makes them a go-to for ultralight thru-hikers.
✔️ USE ANY TYPE OF FLAMMABLE LIQUID, EVEN DENATURED ALCOHOL. Fuel for alcohol stoves is sold just about anywhere—grocery stores, drugstores, gas stations, etc. This makes them an excellent option for hikes all over the world.
✔️ CHEAP AND ACCESSIBLE STOVE TO MAKE/BUY. You can easily create this stove out of things you have lying around. For example, an old beer can, or an empty can of cat food can work.
❌ MESSY. Alcohol can get all over the stuff. When finished cooking, your can is often left with alcohol to wipe out as well. This can turn you’re after-meal clean-up routine into a bit of a drag. If you use an alcohol stove, it's beneficial to have sealed ways for carrying your stove and fuel in your pack.
❌ UNSTABLE (AND POTENTIALLY DANGEROUS) AND CAN SPILL WHEN LIT. A rather flimsy and precarious surface to cook on. Because the stove is so light, it’s easy to knock over. Accidents in the past have even caused certain major parks (Rocky Mountain National Park, for example) to change their rules and now allow only stoves with on/off switches.
❌ WEAK AND INFLEXIBLE FLAME. These have one setting... low. Not ideal for windy conditions or a fast boil. Alcohol doesn’t burn as hot as other fuel, and in freezing conditions, these stoves might not even be able to get water boiling. They work best in warm conditions for minimal cooking.
See Best Alcohol Stoves for Ultralight Backpacking

LIQUID FUEL
✔️ STABLE SURFACE TO COOK ON. These are the heaviest and most stable backpacking stove options. Their design makes them practical for year-round weather and various conditions, including snow and ice.
✔️ CHEAP AND FLEXIBLE FUEL. White gas, kerosene, unleaded gasoline. Liquid fuel stoves can run on numerous types of fuel, so it’s usually no problem finding it when it’s time to refill. White gas is the cleanest, hottest, and considered one of the most widely used options.
✔️ LARGE FLAME. Great for hiking partners and group cooking. Where choices like the Jetboil are best for one or two people, liquid fuel stoves have cheaper fuel and more stable bases for holding larger cooking pots. This makes them an excellent, cost-effective choice if cooking for larger crowds.
✔️ BEST OPTION FOR SUB-ZERO CONDITIONS. Liquid stoves hold up in tough climates, working especially well in extreme cold or high altitudes. They have a big advantage over canister stoves here, as they come with a pump that can be used to re-build pressure in the fuel bottle.
✔️ REFILLABLE BOTTLE AND FLEXIBLE FUEL QUANTITY. To cut some ounces, you can fill a fuel bottle only with what you think you’ll need for a trip. Unlike canisters, the screw-top also lets you check and see how much fuel you have left. When refilling a bottle, be sure to leave a little space since gas expands.
❌ HEAVIEST STOVE OPTION, BY FAR. This stove system involves multiple pieces, so the whole set-up can get tedious and heavy. You also may have to prime your stove before using it, which can be a pain.
❌ MOST EXPENSIVE OPTION. Basic models are about 3 oz. and can range anywhere from $30-60, while larger Hybrid models can cost as high as $200. That being said, the fuel, however, costs about ½ that of canister fuel.
❌ REQUIRES MANUAL PUMPING FOR FUEL PRESSURE. We have seen several of these on the trail and always pity the user pumping fuel into them. Not that pumping is particularly hard - just a fiddle. The pump applies pressure to the bottle, holding the fuel, so it flows up into the stove when turned on. It usually takes about 15-30 pumps. Each stove’s prep routine differs, so check the manufacturer’s instructions and test it out at home first.
❌ A LOT OF MOVING PARTS AND MAINTENANCE. Liquid stoves require more maintenance in both set-up and use. They have three parts for assembly: the stove, the pump, and the fuel bottle with an attached fuel line. Before lighting them, it’s always important to check for spilled fuel on any of the pieces. Also, never detach the fuel line from the pump when the stoves are lit.

WOOD STOVES
✔️ CHEAP FUEL SOURCE - FREE FIREWOOD. With wood stoves, you don’t have to buy or carry fuel. You’ll just need to find some finger-sized twigs around camp to get things going.
✔️ DURABLE AND SIMPLE. Using a wood stove is very similar to cooking over an open fire, except your flame is more contained and controlled. The stoves themselves are lightweight, easy to use, cheap, and can last a lifetime if properly cared for.
✔️ THE WALLS ACT AS A BUILT-IN WINDSCREEN. Wood stoves burn from the bottom down, pulling air from holes punched in the base, which helps in protecting the flame. Before deciding on a wood stove, be sure to check the park rules of where you’ll be hiking. Many places have restrictions for using them during fire bans. (Side note: Fire bans typically only apply to “open flames.”)
❌ NEEDS A LOT OF TIME TO SET THE FLAME. Wood stoves aren’t quick and easy. They can be a bit of a hassle to get started, and they require constant attention to keep things going.
❌ FINDING QUALITY DRY WOOD IS A CONSTANT STRUGGLE. Relying on wood for fuel leaves you at mother nature’s mercy. Dry, burnable wood isn’t always a guarantee depending on the environment and terrain of your hike.
❌ POOR COOKING EXPERIENCE. Maintaining a steady flame with a miniature fire is a delicate art… and that tiny fire does not boil anything quickly. This can make it a lot more difficult to cook food that requires more than just boiling water. You’ll have to do extra finessing to get the right flame output.
❌ DIRTY. You’re bound to get soot on your cookware when using wood stoves. It’s beneficial to bring a separate carrying case for storing it and something to wipe down your supplies with.

SOLID FUEL
✔️ BOTH THE STOVE AND TABLETS ARE SUPER LIGHTWEIGHT. Even if you don’t use this as your main stove choice, the tablets are small and packable and can be good in wet conditions or used as fire starters. A 14g tab emits around 12 minutes of burn time.
✔️ EASY TO IGNITE AND A BREEZE TO SET UP. All you need to do is find a clear area, put up the frame, place the fuel block (or tablet) in place and light it up.
✔️ SOLID FUEL STOVES DON’T REQUIRE BULKY CANISTERS. The stove system itself is also compact, often being no bigger than a deck of cards.
❌ WIND CAN BE A BIG PROBLEM, so having a windscreen is highly recommended. The flame can be weak and difficult to control too, so you’ll have some trouble if wanting to adjust it higher or lower. More fuel tablets can add more heat, and a trick for speeding up burn time is to cut the fuel tablet in half.
❌ THE TABLETS CAN HAVE A BIT OF A WEIRD SMELL. Some people say they smell musty, and others say they smell like fish. Either way—not a fun scent to have crammed with your gear.
❌ BOILING TIME AVERAGES RIGHT AROUND 10 MINUTES. Also, tablets are expensive and can be harder to find in rural areas and small towns, making them less reliable compared to other fuel sources.
Packability
Backpacking stoves (and their fuel containers) pack down to all shapes and sizes depending on how compact the stove is and what accessories are included. Smaller is always more packable, but it may be less efficient. Look for the smallest possible stove that still performs up to your needs.
Simmer Control
Stoves with adjustable heat settings let you alter the heat for different cooking styles. This will be an important consideration if you want to do more than just boil water in the backcountry.
For cooking food, we recommend getting a stove with a simmer control. If you’re just boiling water, it’s an unnecessary feature.
Auto "Piezo ignition" button on canister stove (Snow Peak GigaPower).
Ease of use
Certain stoves require more maintenance and longer set-up times, and the pre-heating time on stoves can vary greatly—like anywhere from 5 to 20 minutes. Consider how much time you’ll really want to spend fussing with a stove after a long day of hiking.
Stability and Cooking Surface
Having a stove with a wider base will give you more stability. Also, if you’re making a meal for a bigger group, then choosing a stove with a larger cooking surface or adjustable arms for holding bigger pots should be a consideration.
Integrated vs. Non-Integrated Systems
Integrated stove systems are all-in-one units where the stove and pot connect to work as a unit (like a Jetboil). The stove system sits vertically up-right, boils water fast, and works better in windy conditions since its burner is protected. This is a favored style among minimalist hikers since the design is compact, packable, and easy to use.
Non-integrated stoves have the stove and fuel source as 2 separate units. They don’t block the wind as well and are less stable, but they’re a better option for more elaborate cooking. You can simmer meals and easily switch between different-sized cookware. They also give you the option to use white gas, which is good for higher elevations or cold temps.

Compact canister stove folded up (Soto Amicus).
Performance in adverse conditions
You want your stove to be able to work in the wind, rain, and snow. If your stove isn’t an all-in-one unit or doesn’t have built-in wind protection, building or buying a windscreen is something you’ll want to consider.
A windscreen can also keep moisture away from the flame. Temperature range will also impact a stove's performance, so make sure you’re choosing the right stove and fuel option for your climate.
Fire bans
Fire bans are increasingly becoming the norm, especially in the western US and Canada. Open flame stoves like wood stoves, alcohol stoves, and tablet fuel stoves often are banned when a fire ban is in place.
Canister stoves are usually ok, except in the most extreme conditions. Canister stoves are your safest bet when traveling in fire-ban conditions.

© THRU_r

 650-Calorie Fuel