Introduction
People spend a lot of time choosing the correct pack for their time in the backcountry. They get fitted, test out different models and compare specs to find the backpack that works the best for them. Buying a pack that fits perfectly and offers just the right amount of features is essential, but that's only part of the equation.
You also need to know how to pack your backpack effectively so the weight is evenly distributed and the items in it are easy to find. Don't underestimate the importance of developing a system for packing as a poorly packed backpack can hurt your back and add unnecessary difficulties to your hike.
We want to ensure your next backpacking trip is as painless as possible, so we have compiled some helpful tips on how to pack your backpack. We break down the most common items you will bring on a thru-hike and provide tips on where they should be stored.
Though some thru-hikers use external framed or unframed packs, these tips and tricks apply mainly to minimal, lightweight internal framed thru-hiking packs.
Step #1: Organize for Accessibility
Packing a backpack is all about efficiency - packing items so they are easy to access when you need them the most. It might take time for you to find out what system and organization works best for you. Practice packing and unpacking your backpack both at home and on short trips so you can find figure out what works best. Either way, you want to develop a method that you use the same way, so you have what you need right when you need it.
Before you start cramming items into your pack, you need to organize the things that you are bringing and categorize them based on when you will need them. Learn how to sort your gear in order importance and then add these items to your pack, so the weight is evenly distributed.
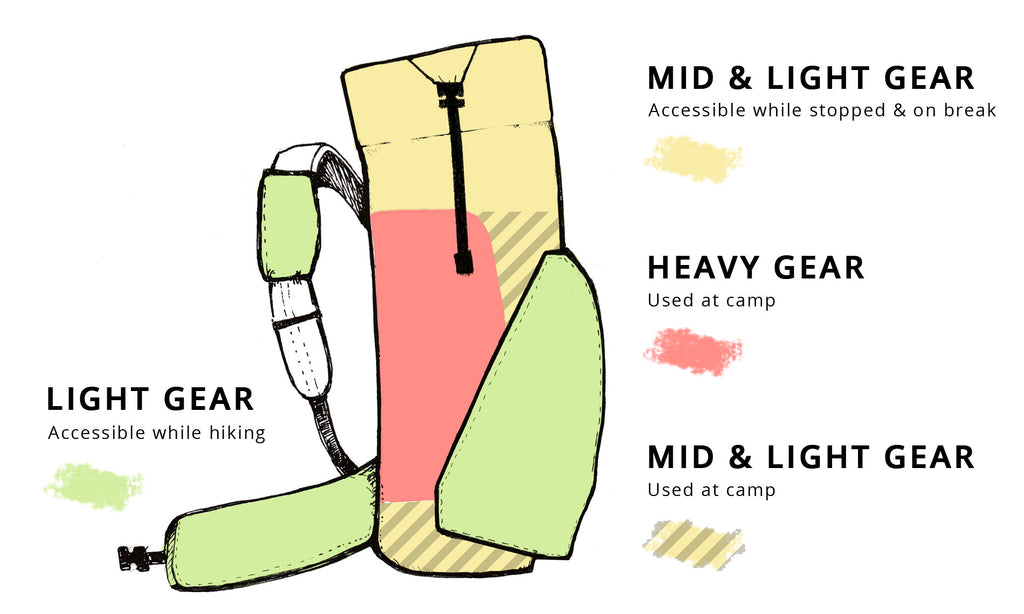
A. ITEMS YOU USE WHILE HIKING (EASY ACCESS)
- Hip pockets: phone, headphones, map, snack, lip balm
- Chest pocket: watch, GPS unit, hand sanitizer, compass
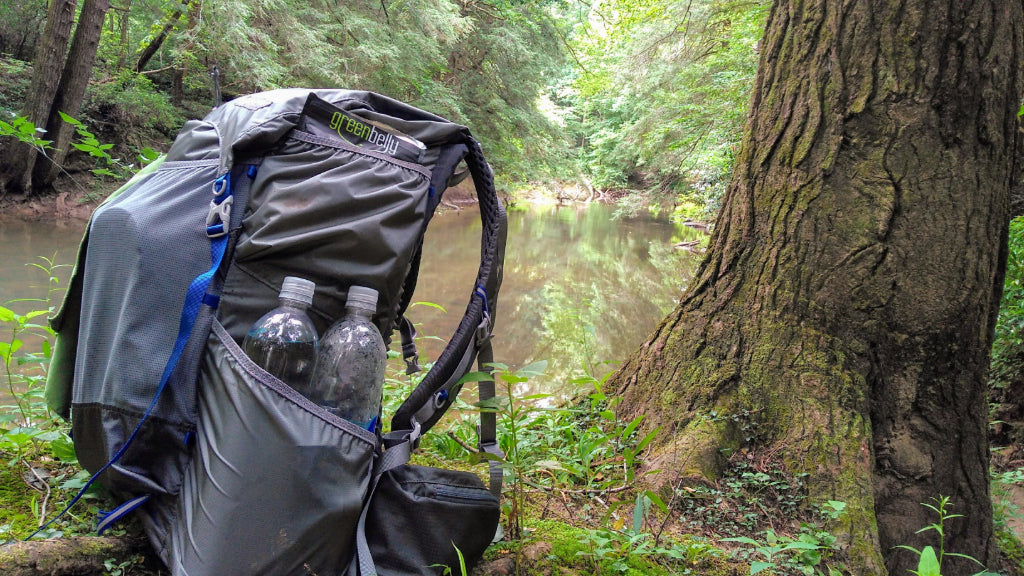
- Side pockets: water bottles and filter, guidebook, trekking poles
You should start first with those items that you frequently will use while hiking. These often-used items include snacks, maps, water bottles, bug spray, lip balm, and other similar small gear. You'll want to store these items so you can access them without having to take off your pack. Use the pockets on the outside of your backpack or external pouches that you attach to your pack.
Most packs have several types of pockets and pouches, including hip pockets, chest pockets, and side pockets. If your backpack doesn't include these pouches, you can add your own. Here is a breakdown of what you should stuff where:
B. ITEMS YOU USE ON BREAK (MODERATE ACCESS)
- Outside front pocket or stuff pouch: camp shoes, rain jacket, extra layers
- Top of the pack: lunch food (and kitchen possibly), toilet paper, headlamp
Next up are those items, such as your rain jacket or lunch, that you use intermittently or only when you stop and take a break. These items should be stored on the outside portion of your pack for convenience, but they don't need to be accessible all the time.
Take advantage of the outside front-facing stuff pocket, if your pack has one, and the pockets on the top or "brain" of your backpack. The outside front pocket is often made of a stretchable mesh which is excellent for stuffing items like your camp shoes or your rain jacket. It has the added benefit of being breathable so wet items can dry.
Unlike the mesh outer pocket, the brain portion of the backpack is zippered shut and wholly enclosed from the elements. It's a great place to stuff items that need to stay dry like toilet paper and your lunch food. You also can store kitchen items there if you prefer to have your cooking stuff all in one place. It's a great place to stash a headlamp, too.
C. ITEMS YOU USE WHILE AT CAMP (HARD TO ACCESS)
- Mid-cavity of pack: food, kitchen, shelter tent
- Bottom cavity of pack: clothes, sleeping pad, sleeping bag
Lastly, you have those items that you only use while at camp. These less-frequently-used items including your clothing, tent, sleeping bag, sleeping pad, dinner meals, first aid supplies and more. You can store these items inside the cavity of the pack since you only need to access them when you call it a day and break for the night.
There's more to packing the inside of the pack than just throwing stuff into the backpack and cinching it up. You'll want to pack your mid-to lightweight items at the bottom of the pack. This gear includes your sleeping bag and sleeping pad which make a great base layer for the rest of your equipment. You then can add the heavier, more rigid items in the middle of the pack, placing them near your back for comfort. Finally, you should top off your backpack with any remaining light gear to balance it off.
Step #2: Distribute By Weight
There is more to packing a backpack than just accessibility. It's crucial to distribute the weight evenly you are carrying so you don't strain your shoulders or back. In general, you should try to keep the heavy items as close to the center and nearest to your back as possible. You also want to keep things balanced, so you are not lop-sided or top-heavy. Going from the bottom up, here is how you should distribute the weight in your pack:
A. BOTTOM INTERNAL CAVITY = MID OR LIGHT GEAR
The bottom of the internal cavity is ideal for your mid to light gear and gear that is bulky. It's also great for items that are not needed until you break for camp. You'll want to put your clothes, sleeping bag, and sleeping pad at the bottom. It's recommended that you stuff your sleeping bag into a plastic bag or similar waterproof sack to keep it dry.
B. MIDDLE INTERNAL CAVITY = HEAVY GEAR
You should place your heavy equipment in the middle of your pack. Ideally, you want the heaviest items to sit as close to your back as possible. Keep in mind that you can sometimes feel things that are close to your back so don't put your cooking pot anything with rough edges in that part of the pack. Stick to smooth items like your shelter or food bag.
C. TOP INTERNAL CAVITY = MID OR LIGHT GEAR
The top of the backpack is ideal for mid- to lightweight equipment that you may need to use during the day. It's perfect for snacks, clean socks, layers, sunglasses, sunscreen, and other light gear.
D. EXTERNAL POCKETS = LIGHT GEAR
Your remaining light equipment and small necessities can go in the external pockets. Most packs have only a few pockets, so this is coveted space. Pick those items that you use frequently and store them in these easy-to-access storage spaces.
(OPTIONAL) ATTACHED TO THE OUTSIDE
After filling up your backpack, you still may have some extra gear that just won't fit inside your pack. These leftovers such as trekking poles, tent poles, and microspikes can be strapped to the outside of your pack.

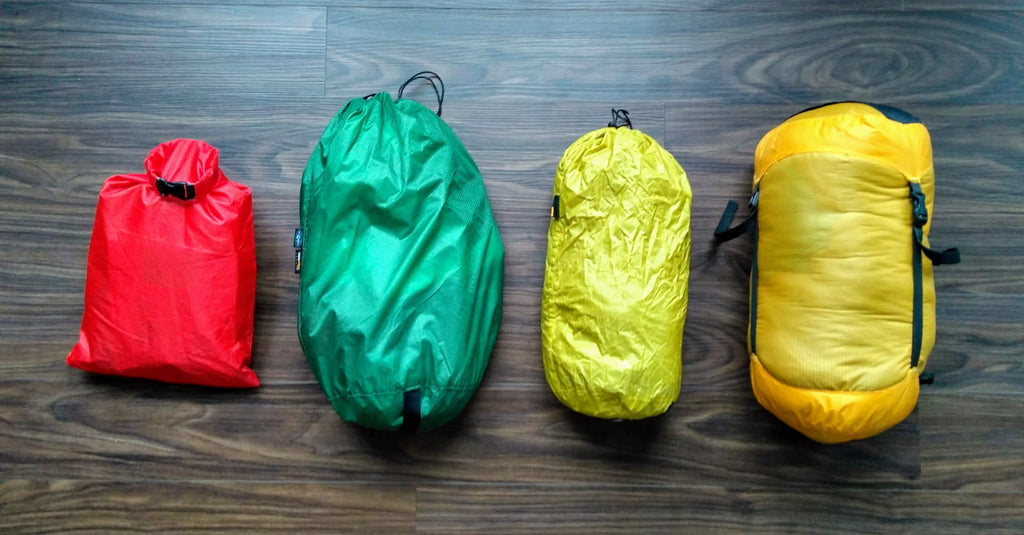
Step #3: Compartmentalize By Group
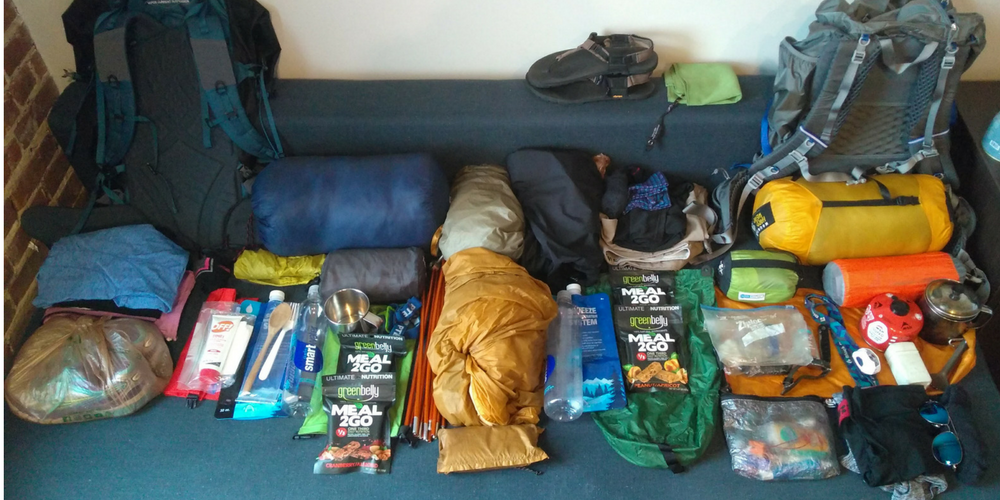
When you are packing for a thru-hike, don't just throw all your stuff into your pack and hope for the best. You'll want to use some form of organization so you can easily find the items that you need. We recommend using stuff sacks or compression bags to keep similar things together. All your cooking supplies can go in one sack, first aid into another and so on. You can even color code them for convenience.
Stuff sacks have the added convenience of keeping your items clean and dry. When you take your dry clothes sack out of your pack, you can set it down on the wet ground and not have to worry about damp and dirty socks when you swap them out.
Common groupings are:
Stuff Sack A (left) = Kitchen + Extras
Stuff Sack B (mid left) = Food
Stuff Sack C (mid right) = Clothing
Stuff Sack D (right) = Sleeping Bag
Tip #1: Pack for Comfort
You won't enjoy backpacking if your pack is not comfortable. Think about the placement of items when you load your pack, especially the stuff you place near your back. You don't want anything that will jab you in your back or sit wrong against your back. This placement is especially important for the super ultralight folks who remove the thick back panel to save weight. If this is a concern, then you should place your sleeping pad up against your back as an extra layer of protection.
You also should keep the items on and inside your pack neat. You don’t want stuff hanging all over the place. Stuff stored loosely on the outside can snag on branches or, even worse, fall out of your pack. You also don't want things rattling around inside. Use small pieces of clothing to secure your cookware and other items that tend to jostle or clang when you walk. DO it for your sanity and those around you on the trail.
Tip #2: Put Your Pack On... the Right Way
HOW TO HOIST A PACK
Once you have packed your backpack, you need to raise it onto your back so can carry your gear up and over those mountains. This is harder than it sounds, especially on a long-distance hike where a typical pack can weigh 20-pounds or more.
Before you even think about putting on the pack, you need to loosen all of the straps of the backpack, so it is easier to slide your arms into the shoulder straps and suspension system. Make sure your backpack is sitting upright on the ground and position yourself so you can pick up the pack.
Resist the urge to pick up your pack by the shoulder straps - it's terrible for you and your backpack. Not only could this damage the shoulder straps, but it also tilts the pack making it difficult to control. Use the haul loop instead to safely lift the backpack and rest it on your thigh where it is closer to your torso and under control.
With the pack on your thigh, slip your arm into one shoulder strap until it is securely on your shoulder. Lean slightly forward to lift the backpack onto your back and slide your other hand into the remaining shoulder strap. Stand up and begin to adjust the pack to fine tune the fit until it is comfortable.
HOW TO BUCKLE YOUR PACK
1. To get the best fit from your backpack, you should buckle it starting with the waist belt. Get the waist nice and snug and then move onto the shoulder straps.
2. Tighten the shoulder straps and the sternum strap enough that the pack hugs your back and doesn't shift when you move.
3. Last but not least, don't forget to cinch down the load-lifter straps which are located at the top of the shoulder straps. These short straps may look diminutive, but they are critical. They help stabilize the weight of the pack and bring it as close to your back as is comfortable.
Other Packing Considerations:
Wet items: It's inevitable - when you are thru-hiking, you're going to get wet. The best way to dry wet items is to hang them outside of your bag while you hike. Wet jackets and wet ran flys will dry quickly when out in the sun or exposed to a light breeze.
Crushable foods: Grabbed some potato chips in town and want to save them as a snack for later? Then store them at the top of your bag or in a pouch on the outside of the pack so they won't get damaged.
Compressing your load: Don't forget to use your side compression straps or shock chords (like granite gear crown model). These straps can be cinched down to secure your load so you can minimize sagging and prevent the weight from shifting around as you hike and climb.
Keeping things dry: Keeping your sleeping bag and clothes dry is imperative. Some people use a rain cover to help keep their pack contents dry, while others use a pack liner. A pack liner, usually a large trash compactor bag, is preferable as it fits entirely inside your pack, completely seals your gear and keeps it dry. A pack cover only covers a portion of the pack allowing water to run down your back and seep into the pack. The only exception may be cuben fiber packs which are inherently waterproof and don't need any additional protection.
Conclusion
When you are organizing your items for a backpacking trip, take a close look at what you are bringing. Ditch the stuff that you don't need and bring only those items that are essential to the trip.
When packing, keep heavier items close to your spine and toward the middle of the pack. Organize your gear in stuff sacks and keep the items you'll need on the trail handy while storing items you only need while at camp at the bottom of the pack.
Want more? Download our Backpacking Pack List.

 650-Calorie Fuel